SwarmDrive firmware
The SwarmDrive firmware is, like the SwarmDrive itself, open source and can be downloaded from GitHub. It is by no means an end product but intended as a well-documented starting point for your own development efforts. A development environment of some sort like PlatformIO with VSCode will be needed to work with the code. As said, the firmware is intended as a starting point for further experiments and development. The code can be found on GitHub. Be sure to read the remarks in the readme for some points of attention.
The code is based upon the ESP-IDF framework and RTOS for reasons explained in the “About” section. It consists of a simple console library and an example motor commutation class. Also included is a simple I2C class library for interfacing with a position sensor (AS5048B) which is needed for a closed loop approach. The console library makes it possible to control motor parameters at runtime. Don’t expect a fancy user interface. The goal was to keep it simple and basic. Building a nice interface was too specific. For a universal use case approach, it was chosen to integrate the complete console functionality within the firmware on-board and not as a separate application running on a host machine. This way the minimal UI can be accessed using whatever serial monitor tool out there. This could even mean a serial interface over Bluetooth or Wi-Fi using a tablet or phone.
The console has two operation modes, with or without a full UI. It’s nice to have a one screen interface but sometimes this gets in the way when running the console over a serial connection on a small device (or when debugging with log statements). The concept of the console consists of commands and parameters which can be set during runtime. A third aspect is presenting information about state and progress. Parameters and commands can be dynamically defined in code. So, the idea is to define commands tied to code using (defined) parameters. The example code is self-explanatory for how to use this.
MCPWM example class
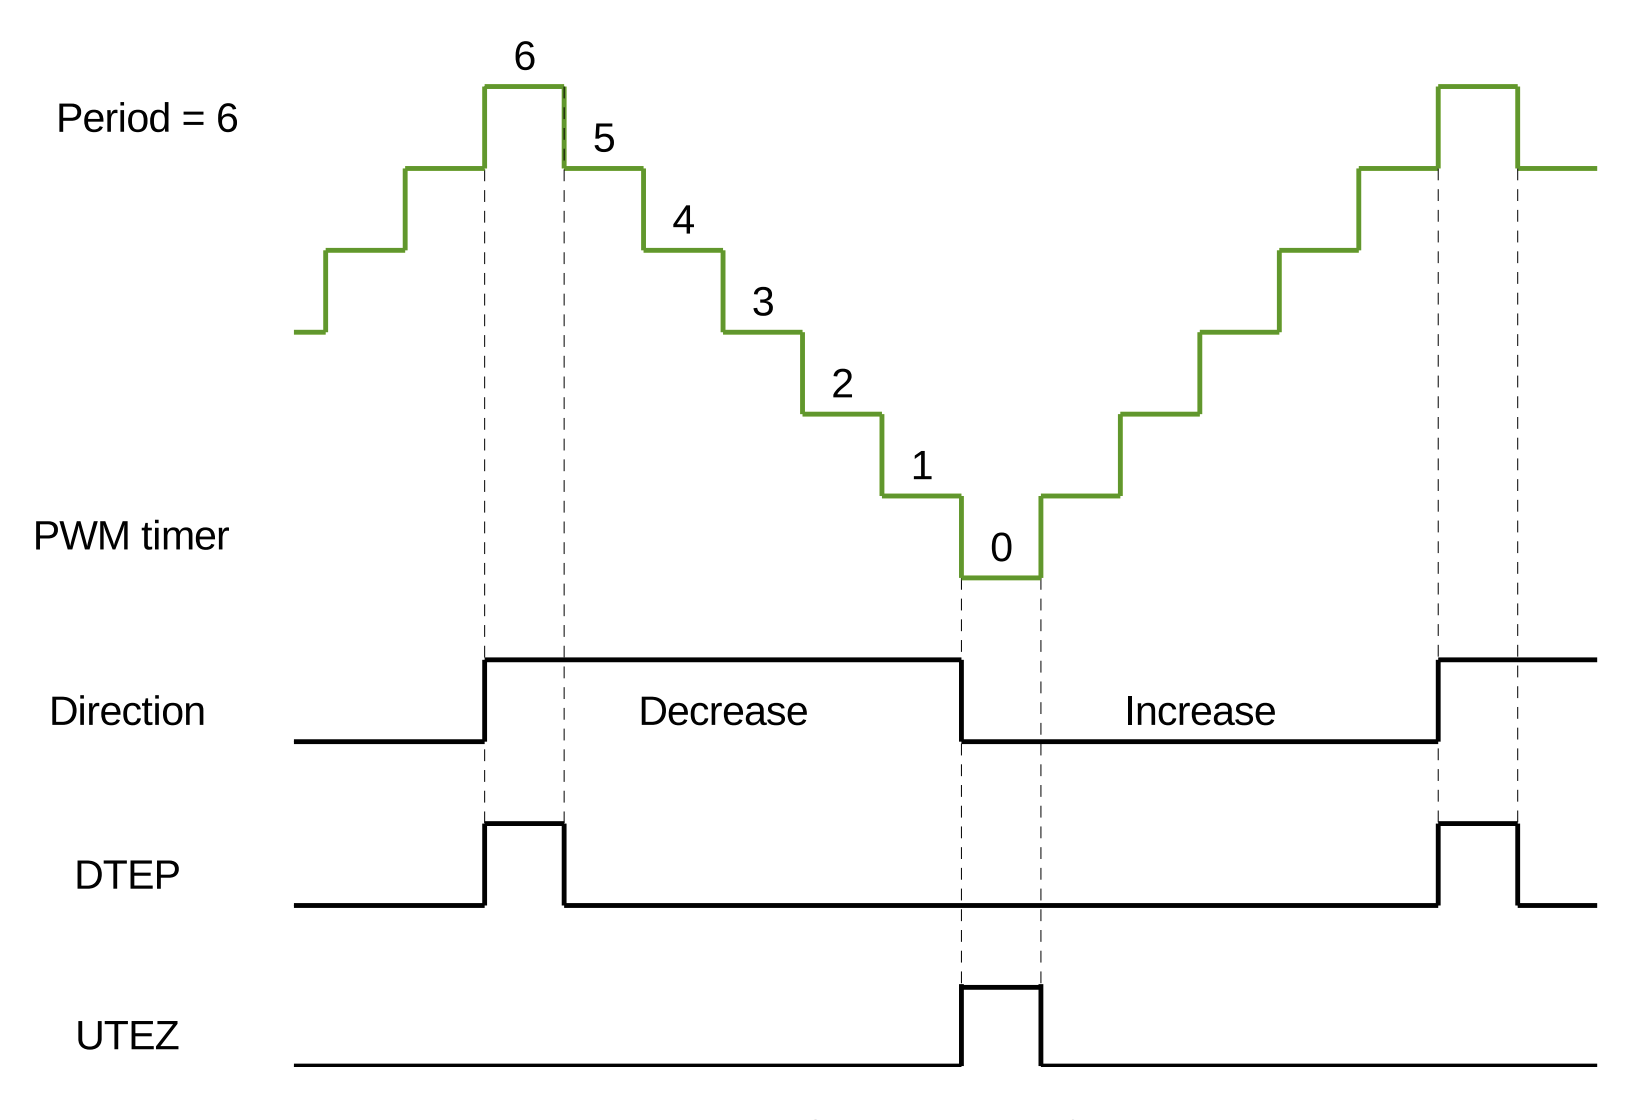
The given example motor class (mcpwm) is using one of the two MCPWM units of the ESP32. This part of the ESP32 was specially designed to do exactly what is needed here. It uses dedicated timers to generate a PWM wave form on three outputs. You could just use a sine PWM approach (varying PWM where its duty cycle mimics a sine wave) but here (in this example) a symmetrical PWM is used using the SVPWM approach where the varying PWM produces a Space Vector pattern. This is done using a triangle up-down counter configuration.
Furthermore, a SVPWM lookup table is created during the instantiation of the Motor class object. With this lookup table the right duty cycle values can be set to “steer” the rotor in a chosen angle. But keep in mind that this table represents one “signal rotation”, that is, one full cycle for just one coil pair. To be able to determine the relation between the real motor angle and the signal rotation you could see a full physical rotation as a series of signal rotations. So, one signal rotation covers just one sector of a full physical motor rotation. After one sector ends, another sector starts over.
For controlling the motor, it is important to know how many sectors or coil pairs there are (a motor can have different number of coil pairs). Also, the direction the motor is running in is important. The initial direction of the motor depends on the order in which the coils are fired (or in what order they are connected). So, at start-up a calibration process takes place to determine the number of coil pairs and the direction. This is done by setting movement steps from the lookup table. Changing the PWM to a certain angle and measuring the real physical outcome with a sensor. This can be a tricky process as you need to know what the read sensor value means in conjunction with the sent move steps.

The goal here is to step (one by one) in a direction and see what the sensor angle does. If the sensor is set clockwise the angle value should grow when the motor moves clockwise. If it does not you could simply switch two (any) coils to reverse the motor. This can be done in code as well. Now the motor should be in sync with the sensor. After this you could reset the angle and step until a full turn is made (reading the sensor). If you count the number of steps you know the relation between the number of steps and a full physical movement and you can work out the number of coils or the motor angle of one full signal turn.
After calibration the commutation can be done in steps by just using a loop to send step values from the lookup table or by using a timer. For letting the motor spin at a faster speed, it is necessary to use the timer function. Here a timer callback will be fired at a certain interval which is very precise. This callback does nothing else then reading the sensor and calculate the next step to be sent to the motor. It calls the commutate method which will fetch and set the right coil PWM signals (duty cycle).
Besides some example debug hooks the code contains some general functions to set speed, direction etc. These methods are called from the main task by the use of console commands.
The code is well documented and mostly self-explanatory. The point of all this is to get developers and explorers up to speed quickly. It could function as a starting point for some sophisticated commutation strategies or PID constructs. You could use other libraries or code examples as well of course. Even the use of the ESP32 MCPWM module is not obligatory, you can just as well use other mechanism to generate PWM signals. It’s just an easy way of working when having an ESP32 on-board.